INtro to Using PHOTOSHOP 6 and BATCH CROPPING
What
is Photoshop?
Photoshop
is a powerful image processing and graphics program. It operates using pixels, which are the smallest units of a
digital image. If you were to
magnify (zoom in on) an image displayed in Photoshop, you would see that it
consists of a grid of pixels.
There may be hundreds or thousands of pixels in an image, depending on
its size and resolution. Each pixel
has a specific color and a location.
Photoshop keeps track of the location of each pixel and its color value,
thus, all operations in Photoshop basically involve the selection of individual
or groups of pixels, moving them around, and/or changing their color values.

Basic
things you can do with Photoshop:
• Open a variety of file formats and multiple
files at once
•
Crop your image- getting rid of unwanted portions
• Flip and/or your rotate your image
• Adjust tonal contrasts, levels, brightness,
colors over the entire image, or selected areas.
• Remove or replace parts of your image -
touching up.
• Add text using an overlay (layers)
• Reduce or increase color/grayscale (bit)
resolution of the image
• Reduce or increase image dimensions and image
resolution
• Save files in a variety of formats
• Automate tasks (batch processing)
Tools
and Menus:
Photoshop
provides an image window, tools and palettes, and command menus along the top
of the screen. By using a
combination of menu commands and tools, you can create and modify all manner of
graphic images. Many tools have an
options palette that can be accessed by double-clicking on them.
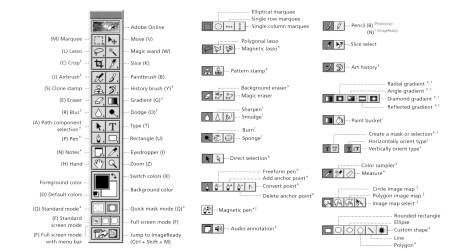
Photoshop
Tools:
Working
tips:
• Always work on a copy of the original, especially while recording actions.
• Always view your image at 100% or larger.
View Menu > Actual Pixels. You can also Zoom In, Zoom
Out, or use the magnifying tool
(press Option/Alt key to zoom out).
•
To Undo operations, choose undo (Edit Menu > Undo) or open the History Palette (Windows Menu > Show History). The History palette lists everything you’ve done. To undo, drag
each item in the list into the trash symbol in the palette; or, simply go up
the list of actions and select the step to which you wish to return. You can also revert to your
previously saved version of your image- File > Revert.
• There are several ways to make copies or duplicate
your file:
File
> Save As
File
> Save a Copy
Image
> Duplicate
• Remember to save archive copies of your
file before or during stages of processing !
BATCH CROPPING: You can
use Photoshop to crop your images in case your computer does not have enough
RAM to crop through a stack using NIH/Scion Image.
1) Know what to crop: Look
through your stack using NIH Image to assess what you want to crop out. Select an image from your stack that
will allow you to outline a cropping margin that will work for your entire
stack.
2) Recording an Action: In
Photoshop, you can automate tasks by recording a sequence of commands while
working on an image, then apply them to an entire folder. A command sequence is called an
Action. To set up an Action, open
the Actions palette (Window Menu > Show Actions). At
the top right of this window there is an arrow that will display the Actions
Menu. Some menu icons are also
shown at the bottom of the Actions palette.
Create
a New Set and name it
“Cropping”.
Create
a New Action and name it
“Cropping Images”.
Before proceeding, make sure you have open a copy of the image you want
to crop. Move the Actions palette
aside so that you can work on an image and see both.
Click
on Record (the record button on the
Actions palette -light will turn red).
Select
the Crop tool from the toolbox, and
click-drag the cursor over the area in the image you want to keep. Drag the
corner handles (little squares) to resize and position the cropping frame.
Once
you have set up the cropping frame,
Click
on the crop tool once more and choose Crop. The area outside the
cropping frame will be deleted.
Press
the Stop Button in the Actions Palette. This turns off
recording and you will notice that the Actions Palette now lists the sequence
of commands; in this case, just
“Crop”. You can
delete, re-record and insert a new command into an Actions list, so if your
Action doesn’t work, you can see where to fix it or start over. This is why it is important to record
on a copy of your image!
Close your image window—do not save!
3) Batch Processing: To apply
your Cropping Action to all the images in a folder, prepare the folder by
placing only the images you want cropped in it. Open the Actions palette and position it on screen so you
can see the commands you are using.
Call up the Batch command (File Menu >Automate
> Batch)
Select the name of the
Actions Set and Action, choose the Source Folder (what you want to process),
and choose a destination folder (where you want to save your batched
images). If you choose the same
destination and source folder, all your images will be replaced with the new
set of cropped images. Once
you have set up your batch options, click OK. This will begin the automation. You can watch how Photoshop implements
the commands listed in the Actions palette. To stop the process, you can click on the Stop button on the
Actions palette, or press the escape key.